CGNAT Traversal with Wireguard
** Note, as of ~mid 2022, I moved over to Tailscale, and eventually Twingate. This was a fun project, but Twingate does the job without the cost of the VPS
Where I live there are essentially 2 options for(usable in this day and age) internet, you go with one of the local WISPs, or you use LTE in some form. The latter of the 2 is what I have ended up with after a few years of spotty and slow sevice with 2 different WISPs. It has some limitations, but I’m able to get 40-50Mbps down and 10-15Mbps up consistently. Someday Elon Musk and Starlink will save me, but for now it works. One of said limitations of using a Verizon LTE connection is Verizon’s CGNAT. This is Verizon’s way of continuing to use it’s finite supply of V4 addresses for a large pool of customers. This can be a big pain when trying to port forward services from you LAN to the internet(which probably isn’t the smartest thing to do anyways). That said, I do have some services on the LAN that are really handy to have access to while away from the house. The most important one for me is Home Assistant, but other things like Blue Iris, or even just being able to ssh into a box can come in really handy. While researching this issue, I initially avoided using VPNs as I had used Open VPN in the past, but wasn’t impressed by the performance or ease of setup. I successfully used a few things such as ssh tunnels, NGROK, and another project who’s name escapes me. All of them did the job, but had their quirks. It never really reached the level of reliability to just set and forget. Eventually, I stumbled upon Wireguard, and by stumble, I mean I read so many comments in forums and reddit posts suggesting it that I caved and decided to try it. Initially the setup seemed a bit complicated, but after getting it working I realized that it performed really well. Probably the fastest connection that I was able to get out of any of the solutions that I had tried. I now run a full tunnel on my phone that directs tunnels everything to either my LAN, or through the VPS. This makes sketchy free WiFi a lot safer, and I hardly notice any speed penalty. Now I’m going to go into some of the details of how I got this set up as both a resource for anyone that finds my humble little blog looking for answers, and as documentation for my future self.
Things needed:
- A device capable of running Wireguard and doing IP forwarding to other devices on the LAN.
- A VPS, or a computer somewhere that has a publically routable IP address.
- Some client to connect from outside the lan, such as a cell phone.
- ~30 Minutes of your time
Setup:
- The first logical step is to get Wireguard installed on the VPS. In my case I’m using Ubunto 20.04, which has Wireguard support baked into the kernel. If you’re using a different distro, it may be as simple as
<package manager> install wireguard. If not, consult the Wireguard docs. It’s alwaays a good idea to update your repo sources before installing something.sudo apt updateNow you should be good to install the Wireguard package.apt install wireguard - Now that we have the package installed, its time to get the server configured. Wireguard stores its config under
/etc/wireguardby default. I prefer the vim editor, but nano is another good option if you don’t feel like learning how to use vim.sudo vim /etc/wireguard/wg0.confcreates a new file under the/etc/wireguarddirectory, and opens vim to edit the file. - In my case, the file looks like this:
[Interface]
PrivateKey = <your private key>
ListenPort = 51820
Address = 10.0.50.1/24
PostUp = iptables -A FORWARD -i %i -j ACCEPT; iptables -A FORWARD -o %i -j ACCEPT; iptables -t nat -A POSTROUTING -o eth0 -j MASQUERADE
PostDown = iptables -D FORWARD -i %i -j ACCEPT; iptables -D FORWARD -o %i -j ACCEPT; iptables -t nat -D POSTROUTING -o eth0 -j MASQUERADE
[Peer]
PublicKey = <your public key>
AllowedIPs = 10.0.50.2/32 ,10.0.0.0/24,  192.168.0.0/24
Let’s break this down a bit. Everything under [Interface] is describing the interface on the local(to the config file) machine, in this case wg0.
- To get a private key, you can run
wg genkey | tee privatekey | wg pubkey > publickeyto generate 2 files,publickeyandprivatekey. The private key should never leave this machine, and it’s content can be pasted into the config file. We will use the public key for the config of the clients later. - The listen port is fairly self explanitory, the port that Wireguard is listening on. You can change this for some added security, but that’s arguably more obscurity than security.
- The address the is the address that the interface (wg0 in this case) will use.
Postupis for running a command after the interface comes up. Here we are using some iptables rules to accept incoming and outgoing traffic from the Wireguard interface, and then routing traffic from wg0 to eth0.PostDownis the opposite of PostUp. Here we are deleting the iptables entries after wg0 does down.
Everything under [Peer] describes another node on the wireguard network. You can make multiple if you want multiple nodes.
- The public key can be generated on the peer later, and pasted into here.
- Now that we have the config mostly set up on the VPS, we can configure the device on the LAN to act as a gateway. Follow steps 1 and 2 again on the LAN device, and generate another keypair on this device.
wg genkey | tee privatekey | wg pubkey > publickey - Edit
/etc/wireguard/wg0.confon this device now, the config should look something like this:
[Interface]
PrivateKey=<your private key>
Address=10.0.50.2
ListenPort=51820
PostUp = iptables -t nat -A POSTROUTING -o eth0 -j MASQUERADE
PostUp = iptables -A FORWARD -i wg0 -j ACCEPT
PostUp = sysctl net.ipv4.ip_forward=1
PostDown = iptables -t nat -D POSTROUTING -o eth0 -j MASQUERADE
PostDown = iptables -D FORWARD -i wg0 -j ACCEPT
PostDown = sysctl net.ipv4.ip_forward=0
[Peer]
PublicKey=<your public key>
AllowedIPs=0.0.0.0/0
PersistentKeepalive=25
Endpoint=<vps public IP address>:51820- The public key will be the public key we generated on the VPS
AllowedIPsis for which IP address ranges you want to allow to communicate with the interface wg0. You can use a /32 if you only want a single IP, a /24 for a standard network, or really anything including 0.0.0.0/0 if you want to allow all traffic.PersistentKeepAlivekeeps the tunnel alive by sending packets as often as you tell it to. 25 seconds seems to be what most people use, and it’s worked well for meEndpointis the address of the Wireguard server, in this case the VPS. You can use an IP or a dns name here, and make sure to include the port number.
- Grab the public key from the LAN device, and go paste it into the VPS config under the
Peersection. - Now we should be able to fire up the interfaces. To do this, run
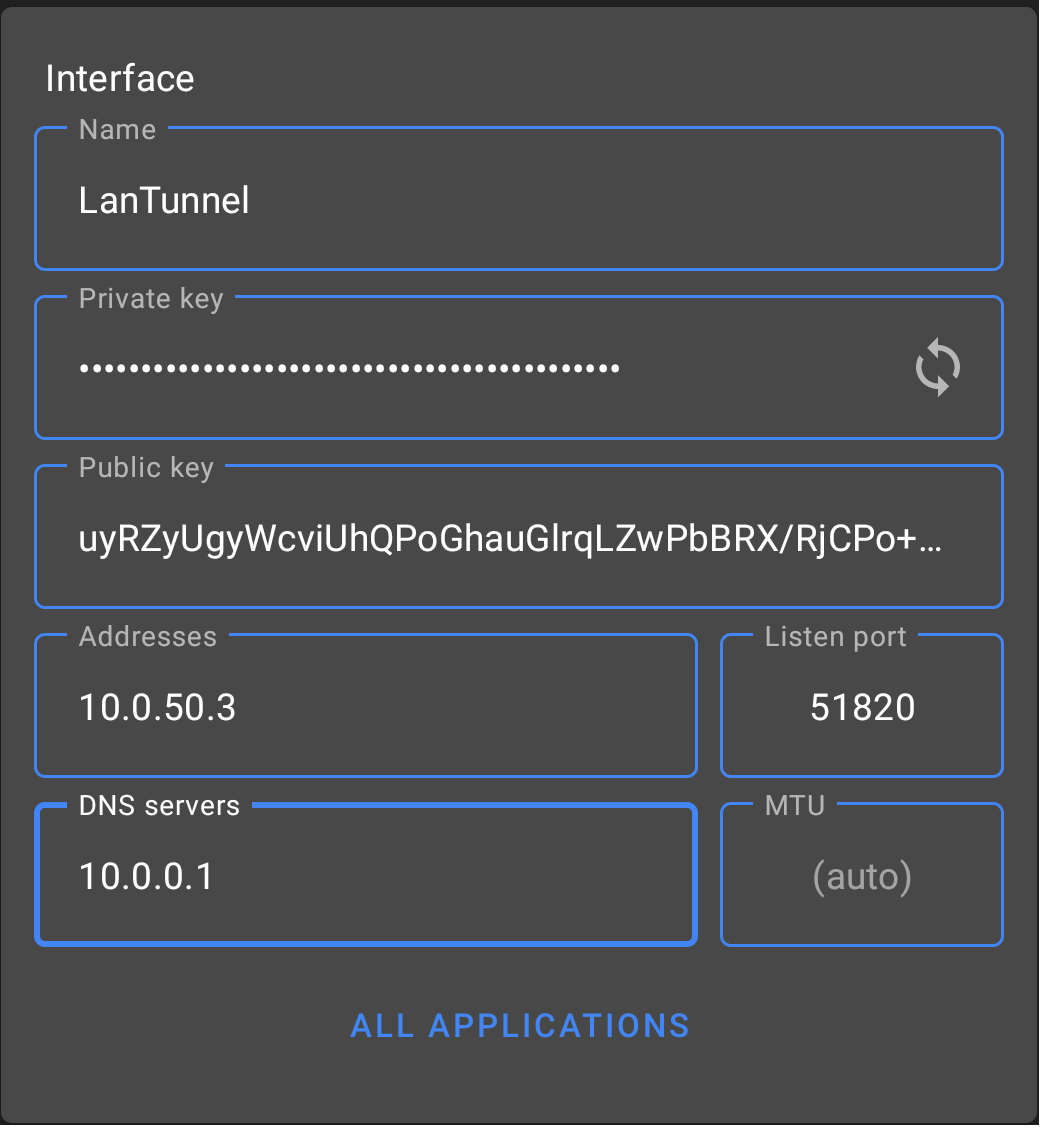
wg-quick up wg0on both devices. Try sending a ping from one interface to the other, and vice versa. If everything was set up correctly, you should be seeing replies. Ping a device on the LAN from the VPS, that should also work and indicates that the ip forwarding rules worked. If it’s not, check if ip forwarding is enabled on the LAN side with the commandsysctl net.ipv4.ip_forward. 0 indicates it being disabled, 1 indicates it being enabled. - Now you can configure a mobile device. I have an Android phone, and was able to install the Wireguard app from the Play Store. The configuration is pretty straight forward and similar to the other devices. You can even generate a keypair with a button on the mobile app. If you’d like to tunnel all traffic through the VPN, use
0.0.0.0/0for the allowed IPs. If not, use the subnet for the wireguard itnerface, 10.0.50.0/24, and whichever LAN subnets you want access to. Copy the public key for the[Peer]entry on the VPS which should look like this:
[Peer]
PublicKey = <your public key>
AllowedIPs = 10.0.50.3/32
 9. At this point everything should be working. If you’re having issues, a good place to start is using the tcpdump command, and logically going through the steps of what needs to happen. I had some difficulties the first few times I set this up, but have no issues repeating it now.
10. For bonus points, run PiHole either on the VPS, or somehwere on your LAN, and point to it for DNS on the smartphone config. This will give you always on ad blocking if you use the full tunnel option. I run my phone with the full tunnel on almost 100% of the time, save for the few services that act weird when you use a VPS public IP address(looking at you, Netflix).
9. At this point everything should be working. If you’re having issues, a good place to start is using the tcpdump command, and logically going through the steps of what needs to happen. I had some difficulties the first few times I set this up, but have no issues repeating it now.
10. For bonus points, run PiHole either on the VPS, or somehwere on your LAN, and point to it for DNS on the smartphone config. This will give you always on ad blocking if you use the full tunnel option. I run my phone with the full tunnel on almost 100% of the time, save for the few services that act weird when you use a VPS public IP address(looking at you, Netflix).